What’s the best way to sand stairs for a perfect finish?
Get an estimate for your project in 60 seconds

Sanding stairs properly requires the right technique, tools, and patience to achieve that smooth, professional finish you’re after. The best approach involves starting with coarse grit sandpaper to remove old finish and imperfections, then progressively working through finer grits while maintaining consistent pressure and motion patterns.
Whether you’re refinishing hardwood stairs or preparing new construction for staining, the key lies in understanding which tools work best for different stair components and how to handle the unique challenges that curved edges and tight corners present.
Quick tip: Always sand with the grain direction and use 80-grit sandpaper for initial removal, progressing through 120-grit and finishing with 220-grit for the smoothest results.
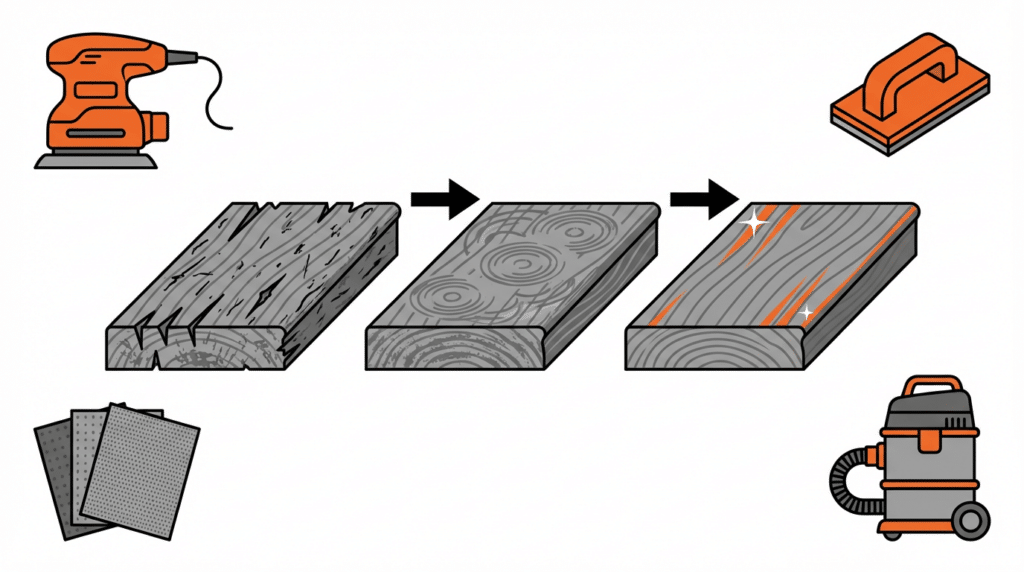
Choosing the right tools and sandpaper grits
Your tool selection makes the difference between a frustrating project and professional results. For stair treads, an orbital sander handles the flat surfaces efficiently, while detail sanders tackle corners and spindle areas that larger tools can’t reach.
Start with 80-grit sandpaper for removing old finishes or deep scratches. This aggressive grit cuts through multiple layers quickly but leaves visible scratch marks that need refinement. Move to 120-grit for smoothing out those initial scratches, then finish with 220-grit for the final polish. Just as different types of sand used in construction serve specific purposes based on their grain size and composition, choosing the right sandpaper grit is essential for achieving optimal results.
Hand sanding blocks work better than power tools for curved balusters and detailed molding. The controlled pressure prevents gouging delicate profiles while ensuring even coverage across intricate surfaces.

Proper sanding technique for each stair component
Stair treads need consistent, overlapping strokes following the wood grain direction. Apply steady pressure without forcing the sander, letting the tool do the work. Overlap each pass by about one-third to avoid creating ridges or uneven spots.
For risers, work vertically with the grain using smooth, controlled movements. These vertical surfaces show imperfections more readily, so take extra care to maintain consistent pressure and avoid circular motions that create cross-grain scratches.
Balusters require patience and hand sanding for best results. Wrap sandpaper around curved sections, rotating the paper frequently to use fresh abrasive surface. Work systematically from top to bottom, checking your progress regularly under good lighting.
Safety reminder: Always wear dust masks and eye protection, and ensure adequate ventilation when sanding stairs to prevent respiratory irritation from fine dust particles.
Managing dust and workspace preparation
Dust control starts before you begin sanding. Seal off adjacent rooms with plastic sheeting and tape to prevent fine particles from spreading throughout your home. Position fans to create airflow that directs dust away from your work area and toward open windows or doors.
Most orbital sanders include dust collection bags, but these fill quickly during stair projects. Empty bags frequently to maintain suction efficiency, or connect your sander to a shop vacuum for continuous dust removal.
Cover nearby furniture and flooring with drop cloths, securing edges with tape. Fine sanding dust settles everywhere and can be difficult to remove from fabrics and electronics once it spreads.
Finishing touches and quality inspection
After completing your final 220-grit pass, inspect each surface under bright lighting to identify any missed spots or inconsistencies. Run your hand along the wood grain to feel for rough patches that need additional attention.
Remove all sanding dust using a tack cloth or microfiber rag slightly dampened with mineral spirits. This final cleaning step ensures your stain or finish will adhere properly without creating bubbles or uneven coverage. Understanding the importance of quality sand for optimal results in construction projects parallels the importance of quality surface preparation in woodworking—both require attention to detail and proper material selection.

Check corners and edges where different grits might have created slight variations in smoothness. Touch up these areas by hand with your finest grit sandpaper, maintaining light pressure to blend any differences.
The table below shows recommended grit progression for different stair conditions:
| Stair Condition | Starting Grit | Middle Grit | Final Grit | Expected Passes |
|---|---|---|---|---|
| New construction | 120 | 150 | 220 | 2-3 |
| Light refinishing | 100 | 150 | 220 | 3-4 |
| Heavy restoration | 80 | 120 | 220 | 4-5 |
Pro insight: Test your finish on a hidden area or scrap piece after sanding to ensure the surface preparation meets your expectations before applying it to visible stair surfaces.
Taking time to sand stairs properly sets the foundation for a beautiful, long-lasting finish. The systematic approach of proper grit progression, appropriate tool selection, and thorough dust management creates results that rival professional refinishing work. Much like the multifaceted uses of sand in construction projects where proper material selection impacts structural integrity, choosing the right abrasive materials and techniques for your stairs ensures durability and aesthetic appeal. Whether you’re working on outdoor staircase support projects or interior refinishing, understanding the benefits of using quality materials in construction helps you make informed decisions. Your patience during this preparation phase pays off with stairs that look stunning and feel smooth under foot for years to come.


